Overview
FreeSWITCH is a scalable open-source telephony platform that routes and interconnects audio, video, text, and other media. With its rich features and stable telephony platform, you can develop many types of applications using a wide range of free tools. This is the first in a series of Flowroute articles on FreeSWITCH configured and tested for AWS EC2.
In this tutorial, you will build and install the latest FreeSWITCH version on an AWS EC2 instance and configure FreeSWITCH with Flowroute to enable outbound calling from your Flowroute phone number.
Requirements
Setup and Installation
1. Launch an Amazon EC2 instance
Amazon offers AWS Free Tier which enables you to gain free, hands-on experience with the AWS platform, products, and services. However, you will be launching an on-demand EC2 instance running Debian GNU/Linux 8 for this tutorial. To calculate your setup cost, visit Amazon's EC2 pricing page.
If you’ve never launched an EC2 instance before, see Getting Started with Amazon EC2 Linux Instances. There are multiple methods you can use to launch an EC2 instance. This tutorial touches on launching your instance via the CLI and the AWS console.
via the AWS Console
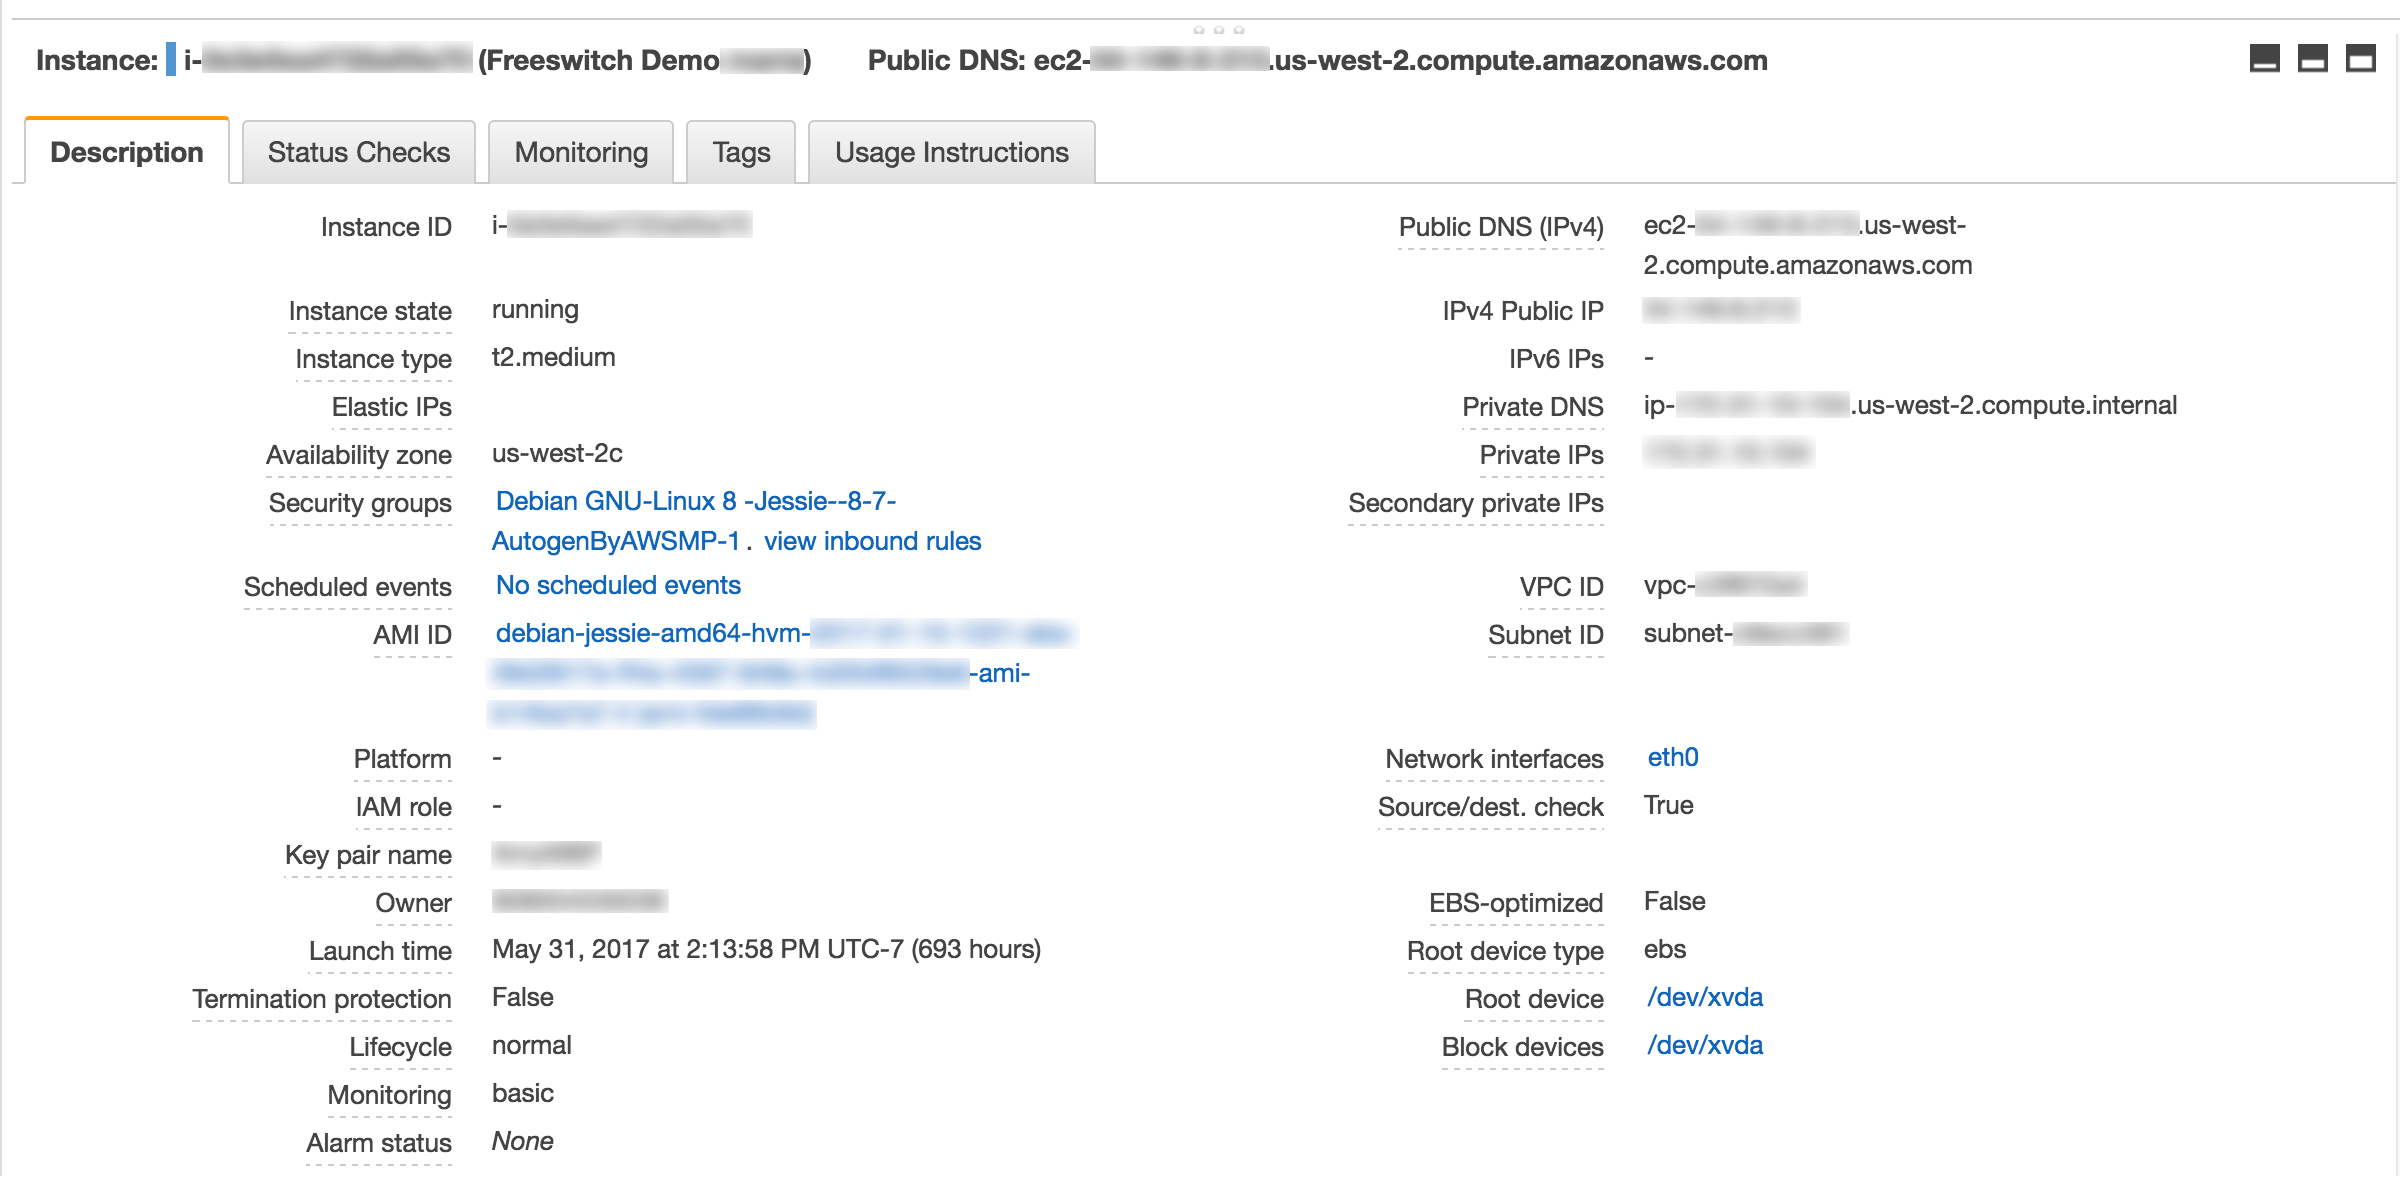
The following outlines the EC2 instance settings for this tutorial's demo FreeSWITCH server:
Choose AMI
AMI (Amazon Machine Image): Debian GNU/Linux 8 (Jessie)
Search for this option on the AWS Marketplace category on the left side of the "Choose AMI" screen.
Choose Instance Type
Instance Type: t2.medium
A t2.medium uses a dual core processor and has been proven to work better with FreeSWITCH than single core
Configure Instance
Network: Keep default VPC
Subnet ID: Select "No Preference".
Auto-assign Public IP: Use subnet setting (Enable)
Use this option to request for a public IP address from Amazon's public IP address pool, which will be associated with your instance until it's stopped or terminated. Disable if you want to associate an Elastic IP instead.
Add Storage
Size: 64 Gib
Volume Type:General Purpose SSD (GP2)
Configure Security Group
The EC2 instance that is configured for this tutorial does not include a custom UDP rule for a UAC (User Agent Client), only to allow all inbound traffic from the specified port range for FreeSWITCH media handling, and SSH (TCP) to allow secure inbound traffic from the IP address of your development machine. Learn more about authorizing inbound traffic here.
| Type | Protocol | Port Range | Source |
|---|---|---|---|
| Custom UDP Rule | UDP | 16834-32768 | 0.0.0.0 |
| SSH | TCP | 22 | <your_computer_IP> |
| Custom UDP Rule | UDP | 5060 | <your_computer_IP> |
via the AWS CLI
To use Amazon EC2 via the CLI, please visit Using Amazon EC2 through the AWS Command Line Interface. To display your instance details using the AWS CLI, run the following in a command shell window:
aws ec2 describe-instances --instance-ids i-<instance_id> --region <region_name>{
"Reservations": [
{
"ReservationId": "r-<your_reservationID>",
"OwnerId": "<your_ownerID>",
"Instances": [
{
"ImageId": "ami-<imageID>",
"VpcId": "vpc-<vpcID>",
"PublicIpAddress": <public_IP>,
"KeyName": "<your_SSH_keyname>",
"BlockDeviceMappings": [
{
...
}
],
"InstanceType": "t2.medium",
"Hypervisor": "xen",
"StateTransitionReason": null,
"RootDeviceName": "/dev/xvda",
"Placement": {
"Tenancy": "default",
"GroupName": null,
"AvailabilityZone": "<region_name>"
},
"PrivateIpAddress": "<private_IP>",
"PublicDnsName": "ec2-<public_IP>.<region_name>.compute.amazonaws.com",
"LaunchTime": "2017-05-31T21:13:58.000Z",
"VirtualizationType": "hvm",
"RootDeviceType": "ebs",
...
},
"NetworkInterfaces": [
{
"SourceDestCheck": true,
"VpcId": "vpc-<your_vpcID>",
"Groups": [
{
"GroupName": "Debian GNU-Linux 8 -Jessie--8-7-AutogenByAWSMP-1",
"GroupId": "sg-cda181b6"
}
],
"Description": null,
"NetworkInterfaceId": "eni-<your_interfaceID>",
"SubnetId": "subnet-<your_subnetID>",
"PrivateIpAddresses": [
{
"PrivateIpAddress": "<private_IP>",
"PrivateDnsName": "ip-<private_IP>.us-west-2.compute.internal",
"Association": {
"PublicIp": "<public_IP>",
"PublicDnsName": "ec2-<public_IP>.us-west-2.compute.amazonaws.com",
"IpOwnerId": "amazon"
},
"Primary": true
}
],
"Status": "in-use",
"PrivateIpAddress": "<private_IP>",
"OwnerId": "<your_ownerID>",
"Attachment": {
"DeleteOnTermination": true,
"AttachTime": "2017-05-31T21:13:58.000Z",
"AttachmentId": "eni-attach-<attachment_ID>",
"DeviceIndex": 0,
"Status": "attached"
},
"PrivateDnsName": "ip-<private_IP>.<region_name>.compute.internal",
"Association": {
"PublicIp": "<IPv4_public IP>",
"PublicDnsName": "ec2-<IPv4_public IP>.us-west-2.compute.amazonaws.com",
"IpOwnerId": "amazon"
}
}
],
"ProductCodes": [
{
...
}
],
"SubnetId": "subnet-<subnet_ID>",
"SecurityGroups": [
{
"GroupName": "Debian GNU-Linux 8 -Jessie--8-7-AutogenByAWSMP-1",
"GroupId": "sg-<group_ID>"
}
],
"Monitoring": {
"State": "disabled"
},
"Tags": [
{
"Value": "Freeswitch Demo",
"Key": "Name"
},
{
"Value": "freeswitch demo",
"Key": "fs-demo"
}
],
"EbsOptimized": false,
"SourceDestCheck": true,
"PrivateDnsName": "ip-<private_IP>.<region_name>.compute.internal"
}
],
"Groups": []
}
]
}
2. Set up your FreeSWITCH environment
Configure passwordless SSH authentication for root
Digital Ocean has a great article on how to generate a public and private key pair on your local machine. Once your keys are generated, display the contents of your public key.
cat ~/.ssh/id_rsa.pub #on your local machine
SSH into your EC2 Instance
With your public key copied, connect to your EC2 instance using the ssh command. You specify the path to your private key (.pem) file and login as admin to your server.
ssh -i /path/my-key-pair.pem admin@ec2-.amazonaws.com
| Command Argument | Description |
|---|---|
| -i | Identity file. Selects a file from which the identity (private key) for RSA or DSA authentication is read. |
| /path/my-key-pair.pem | Path to your private key. |
| admin | After fresh system installation, the root login on the Debian Linux is disabled by default. SSH to Debian instances as user admin using your SSH key, and then sudo -i to gain root access. |
| ec2-<public_IP>.amazonaws.com | The public hostname of your EC2 instance. |
Once you're logged in as user admin, switch to root.
sudo suInstall your preferred text editor and terminal multiplexer
First, prepare your OS environment and install your preferred text editor and terminal multiplexer. This tutorial uses emacs and tmux but you can use my favorite text editor/multiplexer combo, VIM and byobu.
apt-get update && apt-get install emacs-nox tmux
After installing your preferred text editor, paste the public key that you have previously copied into /root/.ssh/authorized_keys. You can logout of your Debian Jessie server and log back in to test passwordless authentication as root.
ssh root@<ec2_public_hostname>Start a tmux session
We will begin our tmux session and name it FreeSWITCH.
tmux new -s FreeSWITCH
tmux TIPS
Here are some great tutorials on how to use tmux:
Build Debian 8 packages from source
Next, let us build and install FreeSWITCH straight from the Debian 8 packages:
FreeSWITCH Installation
wget -O - https://files.freeswitch.org/repo/deb/debian/freeswitch_archive_g0.pub | apt-key add -

echo "deb http://files.freeswitch.org/repo/deb/freeswitch-1.6/ jessie main" > /etc/apt/sources.list.d/freeswitch.list

# you may want to populate /etc/freeswitch at this point.
# if /etc/freeswitch does not exist, the standard vanilla configuration is deployed
apt-get update && apt-get install -y freeswitch-meta-all
Configure FreeSWITCH
Assign EC2 Public IP to External SIP Profile
SIP Profiles allow you to define paths to devices or carriers that may live inside or outside your network. You will update the SIP Profile for external registrations, external.xml, which is used when registering to networks or services that are considered "off-net" which is Flowroute in this case.
- Switch to /etc/freeswitch/sip_profiles.
- Next, open external.xml using the text editor that was installed previously.
- Set ext-rtp-ip and ext-sip-ip parameters to the public IP address of your EC2 instance to facilitate proper media handling.
cd /etc/freeswitch/sip_profilesemacs external.xml
 <--DO NOT USE HOSTNAMES, ONLY IP ADDRESSES IN THESE SETTINGS!-->
    <param name="rtp-ip" value="$${local_ip_v4}"/>
    <param name="sip-ip" value="$${local_ip_v4}"/>
    <param name="ext-rtp-ip" value="<your_ec2_public_IP>"/>
    <param name="ext-sip-ip" value="<your_ec2_public_IP>"/>
Retrieve your Flowroute SIP Credentials
Log into your activated Flowroute account. You will need to retrieve your SIP credentials under the “Registration” tab of the Manage > Interconnection page.
Create a Gateway for Outbound Calls
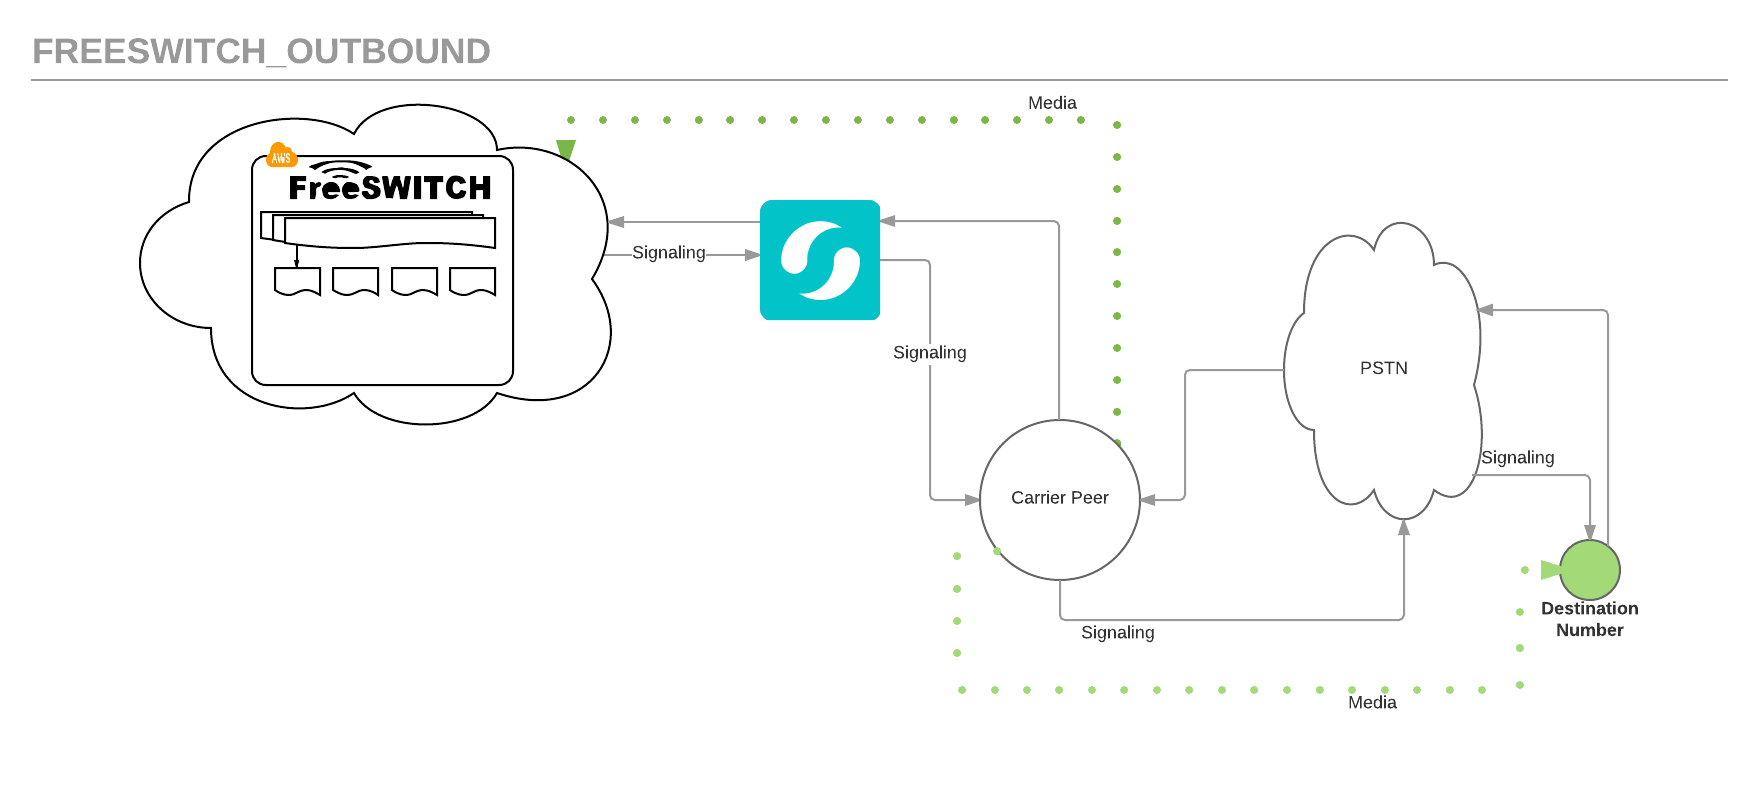
A gateway describes how to use a different User Agent to reach destinations. For example, the gateway may provide access to the PSTN (Public Switched Telephone Network), or in this tutorial, the Flowroute network that provides signaling to the PSTN and the underlying carrier responsible for the phone number that you will be calling. Please refer to the diagram above and this SIP article. Flowroute requires certain information before it will accept a call from the FreeSWITCH User Agent. In this tutorial, you will be creating a gateway for Flowroute to accept SIP registrations from your FreeSWITCH box in EC2.
cd /etc/freeswitch/sip_profiles/external/ #note that you go one directory further than our last update
Define your SIP gateway and call it flowroute.xml.
<include>
    <gateway name="flowroute">
        <param name="username" value="<your_Flowroute_number>" />
        <param name="auth-username" value="<your_SIP_username>" />
        <param name="password" value="<your_SIP_password>" />
        <param name="proxy" value="<Flowroute_SIP_proxy>" />
        <param name="expire-seconds" value="600" />
        <param name="register" value="true" />
        <param name="retry-seconds" value="30" />
        <param name="ping" value="25" />
    </gateway>
</include>
You can find all of the Flowroute-specific information in your gateway in the Interconnection page of the Manage portal. Please note that if you leave the ext-rtp-ip and ext-sip-ip parameters set to their default values, this will cause many issues including a failure in your media connection.
Restart FreeSWITCH and enable SIP Trace
To apply your changes, restart FreeSWITCH:
service freeswitch restart
Go into the command-line interface for FreeSWITCH and turn on SIP trace.
fs_cli

sofia global siptrace on
To review the status of your newly added gateway, run the following:
 Note that the flowroute gateway is in the "REGED" or Registered state
Your SIP registration should look like this:
send 879 bytes to udp/[216.115.69.144]:5060 at 20:20:59.885477:
   ------------------------------------------------------------------------
   REGISTER sip:<Flowroute_SIP_proxy>;transport=udp SIP/2.0
   Via: SIP/2.0/UDP <your_ec2_public_IP>:5080;rport;branch=z9hG4bKtB6c32eUe3Xgm
   Max-Forwards: 70
   From: <sip:<your_Flowroute_number>@<Flowroute_SIP_proxy>;tag=B5g0QraHUraDK
   To: <sip:<your_Flowroute_number>@<Flowroute_SIP_proxy>>
   Call-ID: 8a2a954a-02c8-44ac-a1e0-0508a13c5fc7
   CSeq: 107807948 REGISTER
   Contact: <sip:gw+<your_ec2_public_IP>:5080;transport=udp;gw=flowroute>
   Expires: 600
   User-Agent: FreeSWITCH-mod_sofia/1.6.17-34-0fc0946~64bit
   Allow: INVITE, ACK, BYE, CANCEL, OPTIONS, MESSAGE, INFO, UPDATE, REGISTER, REFER, NOTIFY
   Supported: timer, path, replaces
   Authorization: Digest username="<your_SIP_username>", realm="<Flowroute_SIP_proxy>", nonce="<your_SIP_nonce>", cnonce="eFS78sEKEjWOTwpq++aumg", algorithm=MD5, uri="sip:sip.fl
owroute.com;transport=udp", response="c289298899866d15b840f54d990723e4", qop=auth, nc=00001059
   Content-Length: 0

   ------------------------------------------------------------------------
recv 516 bytes from udp/[216.115.69.144]:5060 at 20:20:59.966729:
   ------------------------------------------------------------------------
   SIP/2.0 200 OK
   Via: SIP/2.0/UDP <your_ec2_public_IP>:5080;rport=5080;branch=z9hG4bKtB6c32eUe3Xgm
   From: <sip:<your_Flowroute_number>@<Flowroute_SIP_proxy>;tag=B5g0QraHUraDK
   To: <sip:<your_Flowroute_number>@<Flowroute_SIP_proxy>;tag=870a5b262384e4f9f82f59836d699db5.17d4
   Call-ID: 8a2a954a-02c8-44ac-a1e0-0508a13c5fc7
   CSeq: 107807948 REGISTER
   Contact: <sip:gw+<your_ec2_public_IP>:5080;transport=udp;gw=flowroute>;q=1;expires=421;received="sip:<your_ec2_public_IP>:5080"
   Path: <sip:216.115.69.144;lr;received='sip:<your_ec2_public_IP>:5080'>
   Content-Length: 0
Debugging
Software development requires patience and a lot of debugging time whenever issues crop up. FreeSWITCH provides you with multiple debugging options, via the console display or via log files.
- To display logs on the console, run
console loglevel 7. - To log information on to /var/log/freeswitch/freeswitch.log, run
fsctl loglevel 7.
To verify that FreeSWITCH has successfully registered to Flowroute, go back into the Interconnection page of Manage and look for active SIP registrations. There may be a couple minutes delay in displaying your specific record due to caching.
See List of SIP Response Codes to learn more about them.
Make a test outbound call
To make an outbound call using the Flowroute number you have specified in your gateway, sip_profiles/external/flowroute.xml, run this command:
originate sofia/gateway/flowroute/ &echo() What FreeSWITCH does is originate a new call and then echo back the audio picked up by the destination number in order to demonstrate a successful two-way media connection.
| Command Line Argument | Description |
|---|---|
| sofia/gateway/flowroute | The URL that you will be calling. |
| <destination_number> | The destination_number that you will be calling in E164 format. For example, 18553569768. |
| echo() | A FreeSWITCH dialplan application for echoing audio back to the originator. |
As an added bonus, you can pass caller ID variables to update the information that will be displayed on the destination number during your phone call.
originate {origination_caller_id_name=<caller_name>,origination_caller_id_number=<caller_number>}sofia/gateway/flowroute/<destination_number> &echo()
To disconnect your existing channels, run the following:
hupallPotential Issues
There are some limitations around media quality and SIP signaling when running FreeSWITCH on AWS especially at a larger scale. The following describes the potential issues and limitations on your FreeSWITCH - AWS setup.
| Issue | Description |
|---|---|
| Packet limits per EC2 instance | Your EC2 instance has a maximum packet limit of 500k/second. Given this limit, a call with a 20ms ptime along with other signaling packets sent during the call limits the amount of concurrent calls to ~4,500 calls per EC2 instance. |
| Call Quality Degradation | There is a possible risk of CPU starvation which can introduce media stream jitter so please keep track of your CPU utilization. AWS has various metrics that you can enable to monitor your CPU usage. |
| Firewall issues | In your security group settings, please enable the correct ports and IPs for SIP signaling and media connection. To review the necessary firewall configurations, please refer to FreeSWITCH Firewall wiki. |
We hope you enjoyed this first tutorial. Next, we will show you how to configure FreeSWITCH to allow for UACs (User Agent Clients) to connect and make inbound and outbound calls using a Flowroute phone number.