Cross-Platform Cloud-based Anonymous Messaging
By Maria Bermudez, Douglas Waller, Sean Hsieh
Last updated: Mon 27 March 2017
The combination of the Internet, cloud, and mobile access has created unprecedented access between buyers and sellers of services. Companies like Netflix (movies), Uber (taxis), and Airbnb (hotels) have completely displaced traditional brick-and-mortar organizations and created immediate access to goods and services through handheld devices. The increase of transactions conducted on smartphones comes at a cost, however. The greater exposure of personally identifiable information results in greater security risk and vulnerability. Your mobile phone is an example of a device that can be uniquely linked to your identity through your cell phone number.
Service providers concerned with the privacy of their users must offer solutions that enable quality customer service without compromising security. One way to accomplish this is through anonymous communication. This enables the consumer to interact with the service provider via a channel that protects their personally identifiable information. As an example, you may want to be able to text a vendor you “met” online with questions but don’t want to compromise your personal information. The anonymous communications solution for this is called “masked numbers” and allows you to use a proxy or intermediary number to facilitate conversations.
This article explores a cross-platform solution leveraging Microsoft’s .NET Core (a version of the popular .NET Framework that can run on Linux, Windows, or MacOS platforms), the Flowroute® v2 API, and Azure App Services. To get started, you’ll need a few prerequisites.
Requirements
- Either Visual Studio 2015 or the cross-platform Visual Studio Code to develop your application (Note: The examples in the article follow Visual Studio 2015, although the application can be built with Visual Studio Code the deployment to Azure is different.)
- An activated Flowroute account
- A Flowroute phone number
- Flowroute API credentials
- An SMS Callback URL
- An Azure account (you can sign up for a free credit if you don’t already have an account)
- The Azure SDK for Visual Studio 2015
To install the .NET Core on your system, follow the instructions at Get Started with .NET Core
These instructions assume you are using Visual Studio 2015. If you are using Visual Studio Code, you can download the associated source code to follow along (the project will run using either IDE). This article explains how to push to Azure App Service using Visual Studio Code.
Overview
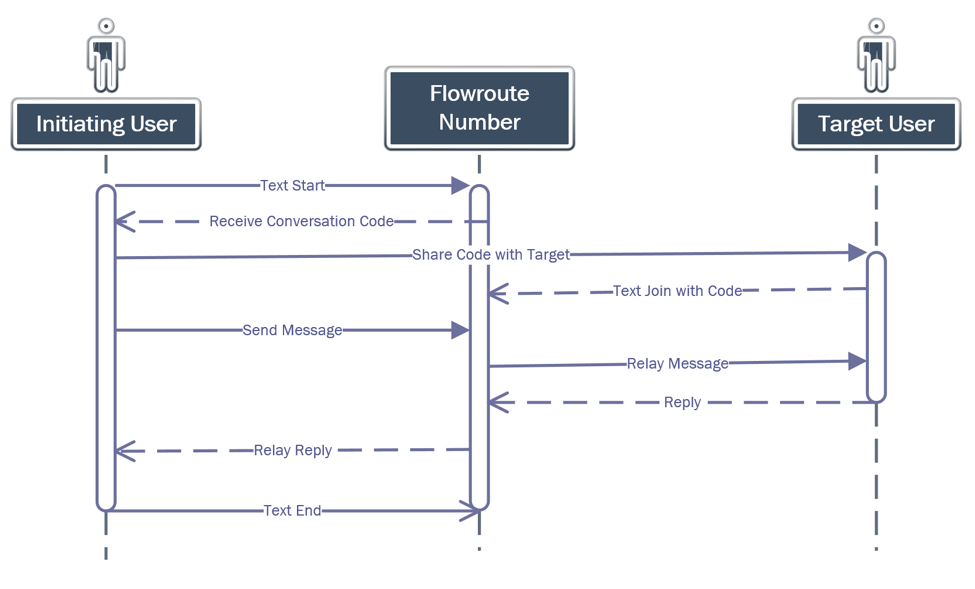
This project will leverage the Flowroute API v2 and use a Flowroute number to broker text messages between two different numbers. Figure 1 illustrates the general concept. A user initiates a conversation with a keyword "Start" to the masked number. The Flowroute API triggers a callback to a REST service endpoint you specify, and posts that code with the person they wish to text; for example, this may be displayed on a website, sent over email, or displayed in a mobile app. The recipient user texts the same masked number a "Join" request, then the two carry on conversations as if they are texting directly. Each person only sees the masked number. A special text command ends the discussion.
Create a new ASP.NET Core Web Application
To get started, create a new ASP.NET Core Web Application project as shown in Figure 2. This will create a boilerplate for the application, including an example controller and endpoint so that you can test the application.
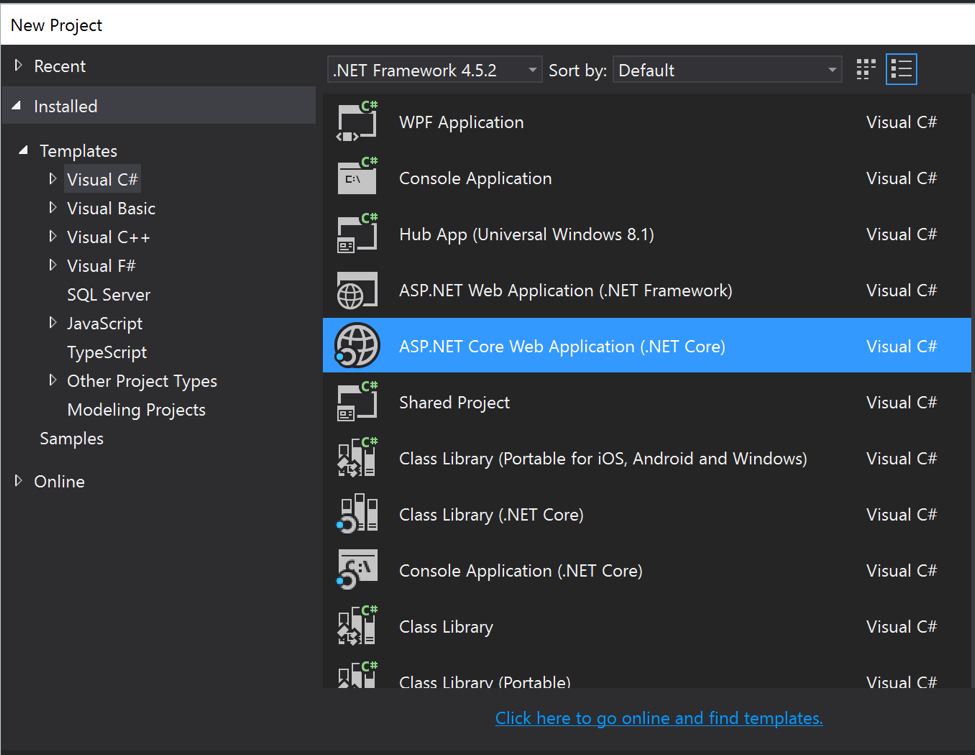 Figure 2: New Project
A second dialog (Figure 3) allows you to choose an empty project, Web API, or Web Application. Choose the Web API project. If you are already familiar with Azure and have an app service set up, you can check the option to host in the cloud. Otherwise, leave this unchecked. Configuring the Azure service and deploying the web app will be covered later. Once the project is created you can hit F5 to debug and confirm it runs correctly.
Create a Test Project
The next step is to create a test project. From a command line window, navigate to the root directory of your application. This should contain the solution file for your project. The example code named the solution FlowrouteVirtMsg so the root directory contains the file FlowrouteVirtMsg.sln and a subdirectory named src. Type the command:
dotnet new -t xunittest
 Figure 3: Web API
This will scaffold a test project. From Visual Studio, you can right-click on the solution and choose add existing project then navigate to test/project.json or test/test.xproj to add the project to the solution. From the test project, right-click and add a reference to the FlowrouteVirtMsg project so that you are able to author tests based on components defined in the web project. You should see a project structure similar to what is shown in Figure 4.
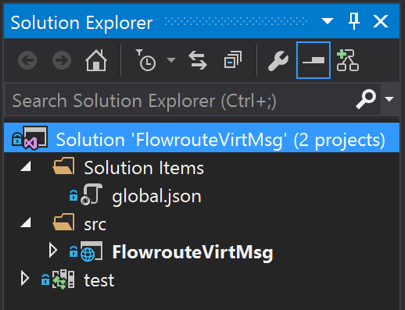 Figure 4: Project Structure
Install the Flowroute .NET SDK
In order to send text messages, the project will use the Flowroute .NET SDK
To install the package, open the NuGet Package Manager console and type the command:
install-package Flowroute
This will pull down the required libraries and reference them in your project as shown in Figure 5.
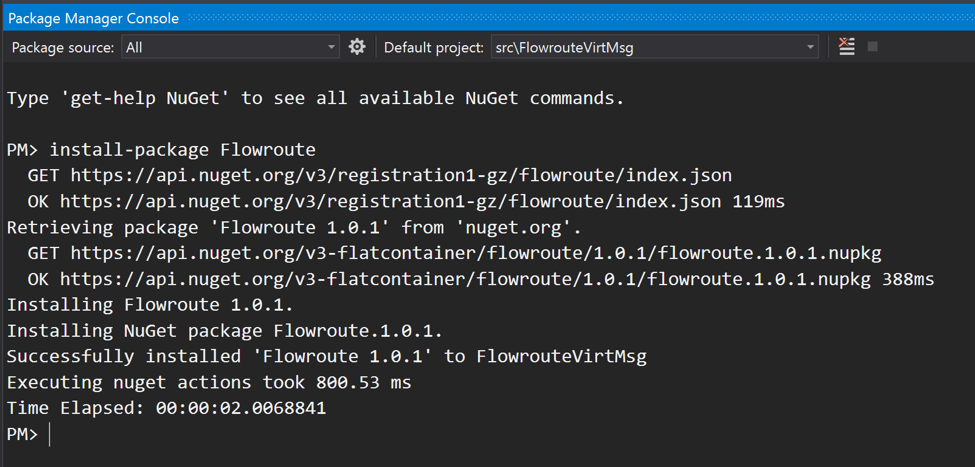 Figure 5: NuGet
Business Objects
Conversations Class
The example project implements the workflow with two business objects. The first, named Conversations, keeps track of discussions. A discussion is represented by the Conversation class:
using  System;
using  System.Collections.Generic;
using  System.Linq;
using  System.Threading.Tasks;

namespace  FlowrouteVirtMsg
{
  public class Conversation
  {
    public Conversation()
    {
    }

    public Conversation(string initiatingNumber, string  code)
    {
      InitiatingNumber = initiatingNumber;
      Code = code;
      JoinedNumber =  string.Empty;
    }

    public string  InitiatingNumber {  get; set; }
    public string  JoinedNumber { get; set; }
    public string  Code { get; set; }

    public bool  Started
    {
      get
      {
        return !string.IsNullOrWhiteSpace(JoinedNumber);
      }
    }
  }
}
This class keeps track of the two numbers, the code, and exposes a flag to indicate whether the conversation has started.
Note: To keep the example simple, the implementation for this demo uses a singleton, in-memory dictionary to manage conversations. This prevents the solution from being load-balanced and will lose information if the server is restarted. A more robust, production-ready implementation would use a repository for the information — a SQL database or Redis for example.
Test the Conversations Object
The business logic is modeled with a set of tests contained in the ConversationTests class. The following set of tests specifies how conversations are started:
[Fact]
public void StartThrowsWhenPassedNullNumber()
{
  var convo = new Conversations();
  Assert.Throws(() =>
  {
    convo.Start(null);
  });
}

[Fact]
public void StartThrowsWhenPassedInvalidNumber()
{
  var convo = new Conversations();
  Assert.Throws(() =>
  {
    convo.Start(badNumber);
  });
}

[Fact]
public void StartReturnsCodeWhenPassedValidNumber()
{
  var convo = new Conversations();
  var code = convo.Start(sampleNumber);
  Assert.NotNull(code);
  var test = new Regex(@"^\d{6}$");
  Assert.True(test.IsMatch(code));
}

[Fact]
public void StartReturnsNothingWhenPassedDuplicateNumber()
{
  var convo = new Conversations();
  var code = convo.Start(sampleNumber);
  code = convo.Start(sampleNumber);
  Assert.Equal(string.Empty, code);
}
Note that the tests follow a pattern known as "design-by-contract" and expect the API to throw specific errors when invalid data is passed. Also, note this class does not interact with any external APIs such as the Flowroute Messaging API. Instead, its single Responsibility is to manage conversations – starting, joining, brokering, and ending as needed.
Here is the implementation of the Start method. Note: It uses thread constructs to synchronize access to the dictionary. Although a concurrent dictionary would work as well, the locks won’t be necessary when using a persistent database or backing store.
public string Start(string number) {
  if (number == null)
  {
    throw new ArgumentNullException("number");
  }
  if (!isPhoneNumber.IsMatch(number))
  {
    throw new ArgumentException ("Invalid phone number.");
  }
  try
  {
    Monitor. Enter (mutex);
    if (_conversations.ContainsKey (number)) {
      return string.Empty;
    }

    var code = random.Next(899999) + 100000;
    var conversation = new Conversation(number, code.ToString());
    _conversations.Add(number, conversation);
    _codes.Add(conversation.Code, conversation);
    return conversation.Code;
  }
  finally
  {
    Monitor.Exit(mutex);
  }
}
The algorithm checks the incoming parameters, ensures the phone number is not already involved in a different conversation, then generates a unique code and returns it to the caller.
For the purpose of this example, it is assumed duplicate random numbers will not be generated. For production, the code should be improved to first check to ensure a code is not in use before returning it, and generate a new one if needed.
Refer to the reference project for the remaining tests and implementation.
ParseResults Class
A second business object facilitates the parsing of text messages. It takes the phone number that initiated the text and the body of the text and determines whether the text is issuing a command to start, join, or end a conversation, or is simply part of an ongoing discussion. The ParseResult class encapsulates the command and related information:
namespace FlowrouteVirtMsg{
  public class ParseResult
  {
    public CommandTypes CommandType { get; set; }

    public ParseResult()
    {
    CommandType = CommandTypes.Talk;
    Text = string.Empty;
    }

    public string Text { get; set; }
  }
}
The command types map to the flow that was diagrammed earlier:
namespace FlowrouteVirtMsg{
  public enum CommandTypes
  {
    Start,
    Join,
    End,
    Talk
  }
}
Test the Message Parser Object
A set of tests in ParserTests specify the expected behavior. Here are a few of the unit tests:
[Fact]
public void ParserReturnsStartForStartCommand()
{
  var parser = new Parser();
  var actual = parser.Parse("Start");
  Assert.NotNull(actual);
  Assert.Equal(CommandTypes.Start, actual.CommandType);
}

public void ParserReturnsTalkForEmptyText()
{
  var parser = new Parser();
  var actual = parser.Parse(string.Empty);
  Assert.Equal(string.Empty, actual.Text);
  Assert.Equal(CommandTypes.Talk, actual.CommandType);
}

[Fact]
public void ParserReturnsJoinWithCodeForJoinCommand()
{
  var parser = new Parser();
  var actual = parser.Parse($"join {sampleCode}");
  Assert.Equal(CommandTypes.Join, actual.CommandType);
  Assert.Equal(sampleCode, actual.Text);
}
After the business logic has been programmed, it is wired into the controller. In the web API project, rename the ValuesController to MessageController. The Set up Inbound Messages documentation specifies how to set up the callback URL and what the messages look like. The InboundMessage class encapsulates the data that will be passed from Flowroute:
namespace FlowrouteVirtMsg{
  public class InboundMessage
  {
    public string To { get; set; }
    public string Body { get; set; }
    public string From { get; set; }
    public string Id { get; set; }
  }
}
The controller sets up values for the access keys and the Flowroute number to be used as the masked number.
For production applications, you would not hardcode the key and secrets in the code. Instead, you can use environment variables and configure them in production, or leverage a solution like Azure Key Vault. You might also consider managing an array of available numbers. This example uses just one single masked number.
The constructor for the controller takes in an instance of Conversations because it must be configured as a singleton to work across multiple requests. The singleton is configured in Startup.cs:
public void ConfigureServices(IServiceCollection services){
  //Add framework services.
  services.AddMvc();
  services.AddSingleton(new Conversations());
}
The main logic of the controller is concerned with parsing the text, then passing the right commands to manage the conversation. If an error is thrown, it returns a bad request; otherwise, it returns success. Keep in mind this endpoint is being called from Flowroute as the result of an incoming text message.
To secure this service and prevent malicious attacks, you should implement security so that requests are only allowed from Flowroute’s servers and valid numbers you manage in Flowroute. Furthermore, production apps should leverage SSL for communications (this example uses plain HTTP for simplicity).
Here is the main logic:
[block:code]st]
public async Task Post([FromBody]InboundMessage value)
{
  if (string.IsNullOrWhiteSpace(value.From) ||
      string.IsNullOrWhiteSpace(value.To) ||
      value.To != Number ||
      string.IsNullOrWhiteSpace(value.Body))
  {
    return BadRequest();
  }

  var step = parser.Parse(value.Body);

  try {
      switch (step.CommandType)
      {
        case CommandTypes.Start:
          await Start(value.From);
          return Ok();
        case CommandTypes.Join:
          await Join(value.From, step.Text);
          return Ok();
        case CommandTypes.End:
          await End(step.Text, value.From);
          return Ok();
        case CommandTypes.Talk:
          await Talk(value.From, step.Text);
          return Ok();
      }
  }
  catch
  {
    // TODO: add logging/tracing
    return BadRequest();
  }

  return Ok();
}
Pass-through a Message via "Talk"
And here is the example method call to pass-through a message (using the “talk” command):
private async Task Talk(string from, string text){
  var to = _conversations.TalkTo(from);
  if (string.IsNullorEmpty(to))
  {
    await client.Messaging.SendMessageAsync(from, Number, "You haven't used START or JOIN to enter a conversation.");
    return;
  }
  await client.Messaging.SendMessageAsync(to, Number, text);
}
First, for testing purposes, you might want to abstract the messaging API behind an interface. In production, that interface will be implemented with a call to the messaging service. In the test, it can simply write to the console or use another mechanism to avoid actual text-based charges on your account. Second, the message call returns a result that indicates whether an error is encountered. The example code does not parse that error, but a production implementation should parse it and log it out and return an exception if the call does not succeed.
Publish the Web Application
Once the codebase is fully implemented, you are ready to publish your end point. From the Azure Portal you can tap App Services, click the Add button and select Web App. Click the Create button as shown in Figure 6.
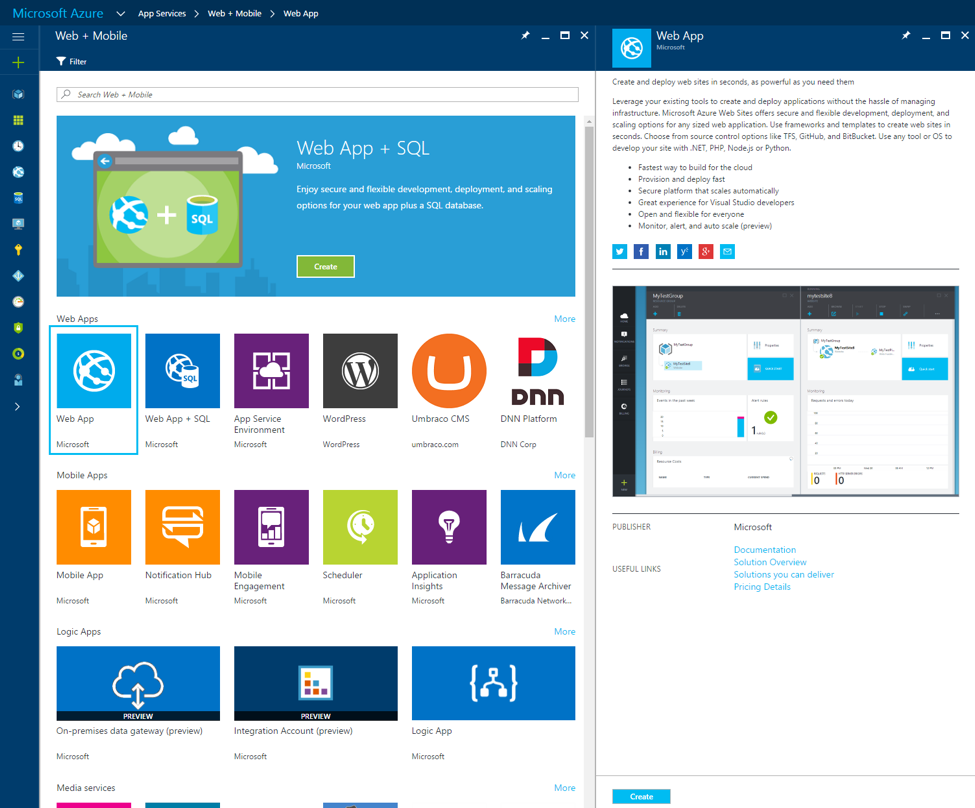 Figure 6: App Services
Give the application a name and a resource group as shown in Figure 7. In this example, the URL will be http://FlowrouteMesaging.azurewebsites.net/ (This is not an active endpoint but just an example for the article).
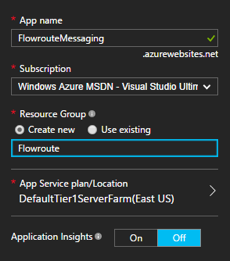 Figure 7: Resource Group
After the app service is up and running, you are ready to publish. From Visual Studio, select Build then Publish FlowrouteVirtMsg. Choose Microsoft Azure App Service as the target. Select your subscription and resource group and then select the app service. Figure 8 illustrates my selection of the FlowrouteMessaging app service.
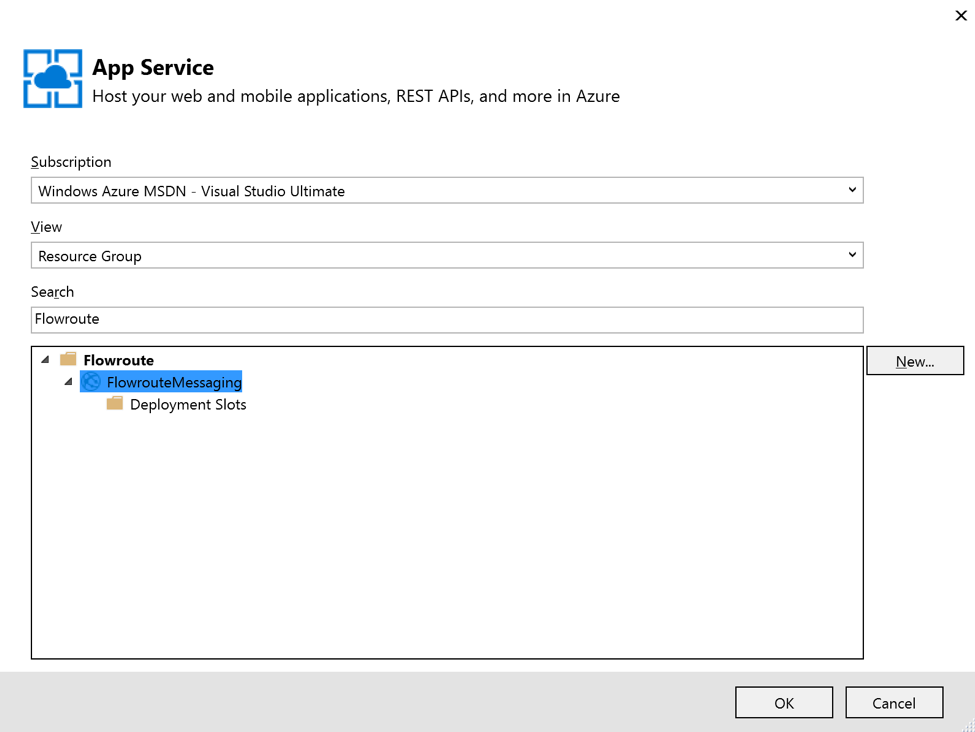 Figure 8: Deployment
The next dialog will automatically pull in all of the credentials needed to publish. You can click the Validate Connection button to ensure everything is wired in correctly. Click Publish and your application is ready to broker anonymous conversations! Be sure to visit your Flowroute API Preferences to enter the callback endpoint, then click the Enable SMS button as shown in Figure 9. The callback URL is the URL of the app service followed by /api/message.
 Figure 9: Enable Callbacks
Now you can engage in a conversation. Text Start to your Flowroute number, and you should receive a code. Share that with another person, and instruct them to text Join <Code> to join the conversation. Figure 10 shows a sample conversation. The other participant texted End <Code> to end the conversation.
Text messaging rates apply! You can also test the solution locally by manually posting messages to the API endpoint to simulate a conversation using a tool like PostMan.
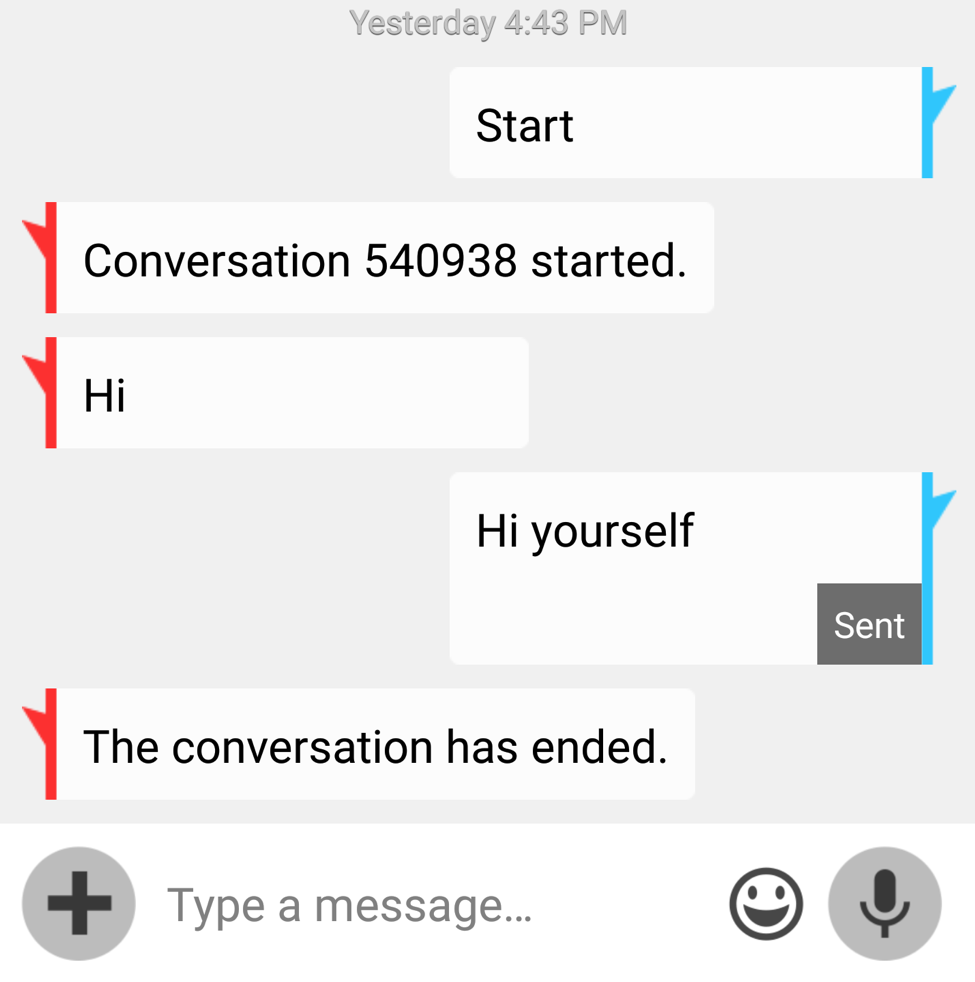 Figure 10: Text Messages
The solution presented here is a small demo of what’s possible when you leverage the combination of cloud services, modern cross-platform web development, and the Flowroute API. This project illustrates management of both inbound and outbound text messages leveraging the Flowroute .NET SDK. You can sign up for an account and integrate advanced messaging services in your own applications within minutes!