Overview
Previously, we showed you how to configure a FreeSWITCH server on a t2.medium EC2 instance and enable outbound calling from your Flowroute phone number. In this tutorial, you will learn how to connect UACs (User Agent Clients) to your FreeSWITCH server and make calls through those UACs.
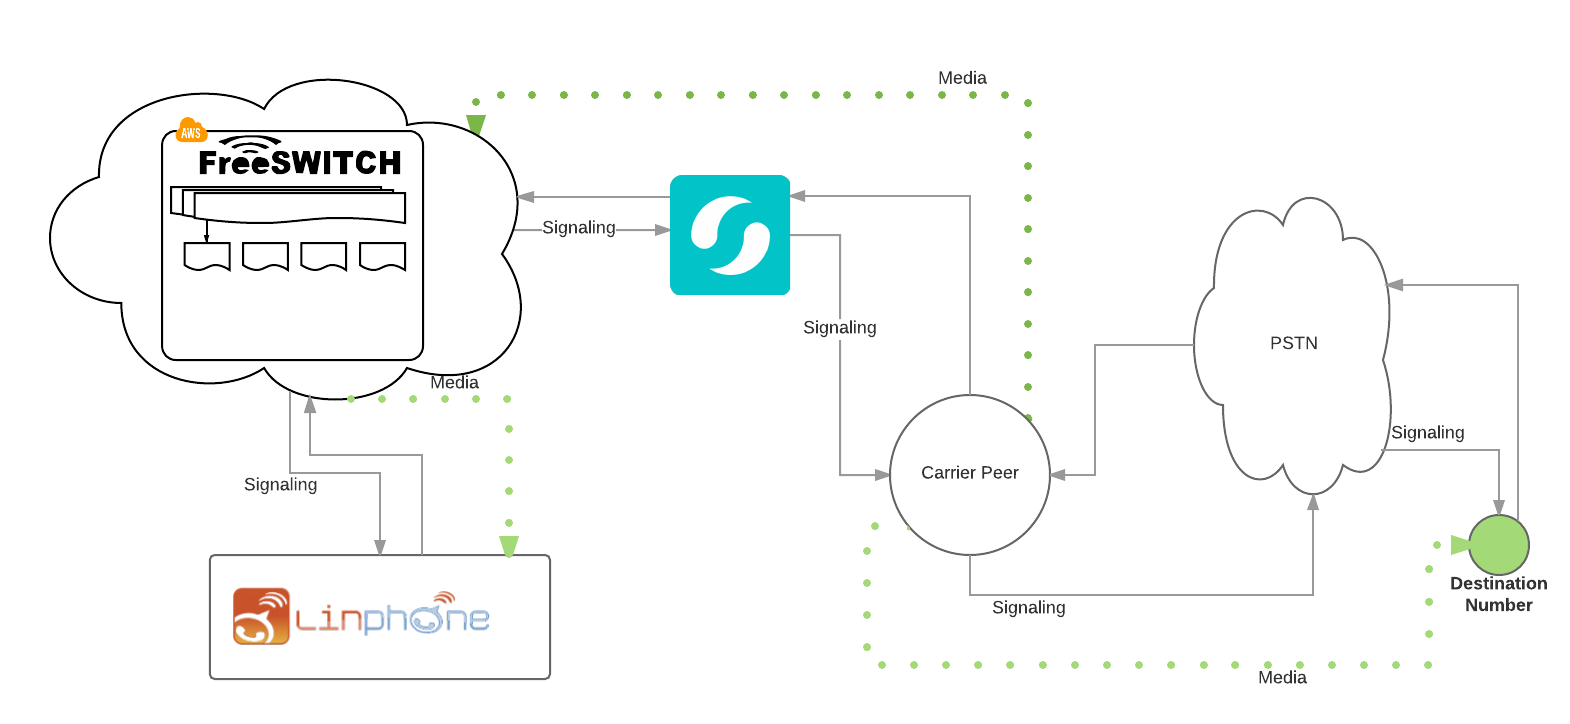
A user agent is responsible for managing SIP sessions, namely sending SIP requests as a client (UAC), and receiving requests and returning a SIP response as a server. You will be using Linphone, a free SIP service, to place and receive your test calls.
Requirements
- An activated Flowroute account
- A Flowroute phone number
- A FreeSWITCH server on your Amazon EC2 instance
- Linphone
Configure FreeSWITCH
First, SSH into your EC2 server as root.
ssh root@<your_ec2_public_IP>1. Define Global Variables
We will need to define a few variables that will be used as preprocessor variables and are expanded during FreeSWITCH reload, by issuing the reloadxml command. Open /etc/freeswitch/vars.xml using your preferred editor and point the external_rtp_ip and external_sip_ip to the public IP of your EC2 instance.
/etc/freeswitch/vars.xml
<X-PRE-PROCESS cmd="set" data="external_rtp_ip=<your_ec2_public_IP>"/>
<X-PRE-PROCESS cmd="set" data="external_sip_ip=<your_ec2_public_IP>"/>
Lastly, set your default SIP provider to Flowroute.
<X-PRE-PROCESS cmd="set" data="default_provider=flowroute"/>
2. Update SIP Profiles and previously created gateway
External
Next, let's update the parameters in our External SIP profile that we have modified in the previous tutorial to reference two of the global variables we have set above.
/etc/freeswitch/sip_profiles/external.xml
<param name="ext-rtp-ip" value="$${external_rtp_ip}"/>
<param name="ext-sip-ip" value="$${external_sip_ip}"/>
Gateway
Move one directory up and switch to external, /etc/freeswitch/sip_profiles/external, and open the gateway file, flowroute.xml that you have created in the previous tutorial. Update ext-rtp-ip and ext-sip-ip as above.
Internal
Since we will be adding a SIP client, the Internal profile, /etc/freeswitch/sip_profiles/internal, will need to be updated as well for handling registrations for our SIP client.
3. Build XML Dialplans
Custom Default
Let's name our dialplan 00_custom_carrier.xml. Copy and paste the following into your preferred text editor. /etc/freeswitch/dialplan/default/00_custom_carrier.xml
<include>
<context name="carrier">
<extension name="unloop">
  <condition field="${unroll_loops}" expression="^true$"/>
  <condition field="${sip_looped_call}" expression="^true$">
    <action application="deflect" data="${destination_number}"/>
  </condition>
</extension>
<!--
    Tag anything pass thru here as an outside_call so you can make sure not
    to create any routing loops based on the conditions that it came from
    the outside of the switch.
-->
<extension name="outside_call" continue="true">
  <condition>
    <action application="set" data="outside_call=true"/>
    <action application="export" data="RFC2822_DATE=${strftime(%a, %d %b %Y %T %z)}"/>
  </condition>
</extension>

<extension name="call_debug" continue="true">
  <condition field="${call_debug}" expression="^true$" break="never">
    <action application="info"/>
  </condition>
</extension>
<!-- ring, pause, answer and put in a conference -->
<extension name="conference">
  <condition field="destination_number" expression="^(1\d{10})$">

    <action application="ring_ready" />
    <!-- sleep timer in ms -->
    <action application="sleep" data="5000" />
    <action application="answer"/>
    <!-- $1 is the destination_number value and ${domain_name} is ENV VAR -->
    <action application="conference" data="$1-${domain_name}@default"/>
  </condition>
</extension>

  </context>
When a call needs processing, FreeSWITCH™ evaluates each extension in our dialplan, 00_custom_carrier.xml, until it finds a match. In our specific file, we have updated the condition within the conference extension to look for a destination number matching the pattern in our regular expression which is 1 followed by a 10-digit number. When our condition is met, FreeSWITCH will execute the action applications specified within destination_number.
TIP
Regex 101 is a great site for testing and writing your regular expressions.
Custom Public
Next, let's build a custom public dialplan to enable inbound calling on the SIP client that we will be registering with FreeSWITCH.
/etc/freeswitch/dialplan/public/00_flowroute.xml
<include>
    <extension>
        <condition field="destination_number" expression="<your_Flowroute_number>">
            <action application="ring_ready" />
            <action application="sleep" data="3000" />
            <action application="answer" />
            <action application="bridge" data="sofia/internal/flowroute-ext1%${sip_profile}" />
        </condition>
    </extension>
</include>
4. Create a SIP Phone Extension
In order to connect a user agent client to your FreeSWITCH application server, you will need to create an authenticated user account, or your SIP phone extension, that you will associate with your Flowroute phone number that you created a dialplan for.
Switch to the FreeSWITCH directory folder which contains accounts (i.e., XML files) for all users (i.e., SIP phone extensions) that may register to FreeSWITCH. Since we’ll be associating this extension with your Flowroute phone number, let us name our account flowroute-ext-1.
/etc/freeswitch/directory/default/flowroute-ext1.xml
<include>
  <user id="flowroute-ext1">
        <params>
          <param name="password" value="<your_FreeSWITCH_password>"/>
          <param name="vm-password" value="12345678"/>
        </params>
        <variables>
            <variable name="toll_allow" value="domestic,international,local"/>
            <variable name="accountcode" value="flowroute"/>
            <variable name="user_context" value="default"/>
            <variable name="effective_caller_id_name" value="FWR_EXT1"/>
            <variable name="effective_caller_id_number" value="<your_Flowroute_number>"/>
            <variable name="outbound_caller_id_name" value="Freeswitch tutorial extension"/>
            <variable name="outbound_caller_id_number" value="<your_Flowroute_number>"/>
            <variable name="callgroup" value="dev"/>
        </variables>
    </user>
</include>
Your basic configuration can be quite simple and can consist of only your username and password. In our example extension, we have also specified a voicemail PIN using the vm-password parameter. Please note that there are two ways to update your extension’s voicemail PIN: via 1) passing a value as shown above, or via 2) changing the password in the voicemail system. If the value is set to "user-choose", then there is no configured password and only the user set password is used. Note that any changes to the password from a phone are stored in the voicemail_prefs table and will not override the value set in the directory XML. The result is that there will be 2 passwords that can access the voice mailbox - the one set in XML and the one that the user set from the phone. We have also added the necessary variables for routing phone calls and adding identifiers on both the calls and their associated detailed records.
| Variable | Description |
|---|---|
| toll_allow | Defines the type of calls that the phone extension can make. |
| accountcode | Can be an arbitrary value that you can assign on a per leg basis. This is important for determining the template to assign and apply for generating CSVs of CDRs (Call Detail Records). Templates are defined in the configuration file, /etc/freeswitch/autoload_configs/cdr_csv.conf.xml. |
| effective_caller_id_name and effective_caller_id_number | Sets the effective caller ID name and number for internal phone numbers. |
| outbound_caller_id_name and outbound_caller_id_number | Sets the name and phone number that is displayed on the receiving device when you call out. |
| callgroup | Assigns a group for the user to belong to. A user in a callgroup can perform a "call pickup" (or an "intercept") of a ringing phone belonging to another user who is also in the callgroup. |
5. Restart FreeSWITCH and enable SIP Trace
To apply your changes, restart FreeSWITCH:
service freeswitch restart
Go into the command-line interface for FreeSWITCH and turn on SIP trace.
fs_cli

sofia global siptrace on
Register a SIP Account with LinPhone
Linphone, which is short for Linux phone, is a free VOIP service and SIP client. It now supports many additional platforms including Microsoft Windows, Mac OS X, and mobile phones running Windows Phone, iOS or Android. In this tutorial, we are testing Linphone 3.11.1 on Mac OS X. Download the package specific to your device here.
After installation, launch Linphone on your machine. Under Options -> Preferences -> Manage SIP accounts, click + Add under Proxy Accounts to add your FreeSWITCH extension details.
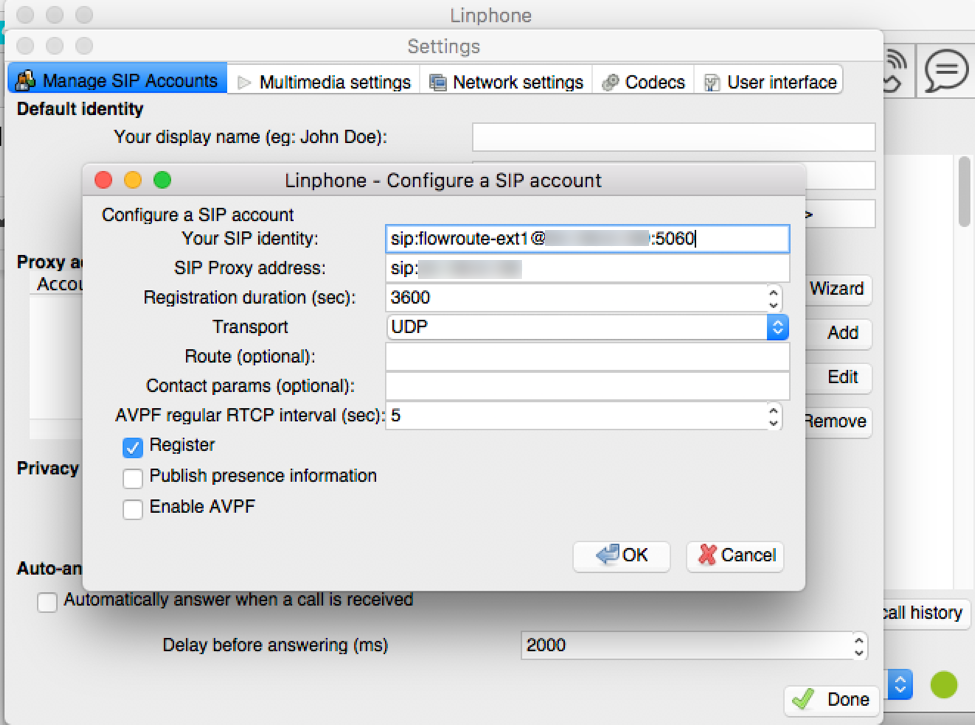
| Field Value | Description |
|---|---|
| sip:userid@sip_provider:port | Where sip: is a required prefix, userid is the SIP extension you have added on FreeSWITCH, sip_provider is the public IP of your EC2 instance, and port is the default internal SIP port for FreeSWITCH. |
| sip:sip_provider | A SIP Proxy is an intermediary entity that acts as both a server and a client for the purpose of making requests on behalf of other clients. In this case, it will be the public IP of our EC2 server which we have previously configured to allow certain inbound traffic. |
Click OK and you will be asked to enter the password that you have set for your FreeSWITCH user account or SIP phone extension. Click Done to register your SIP identity. The button next to your identity section on Linphone should turn green once you’re registered with Linphone.
Make Your Test Calls
Let’s briefly touch on call legs. These refer to active pieces of a call. For your first test call, place an outbound call from your Flowroute number via Linphone to a number you have access to (your mobile number, for instance). In this scenario, the originator of the call, the Flowroute phone number, is A leg. The recipient, your mobile number, is B leg. Looking at it that way, call legs could be oversimplified as representing each half of the call.
Make an outbound call via your SIP client, Linphone, to a number you have access to (your mobile number). Linphone will prompt you to enter your password.
Click OK to place your outbound call. To test inbound calling on your SIP client, place an outgoing call from your mobile number to your Flowroute number registered with Linphone.
When the call is over, FreeSWITCH neatly records the call detail in a CSV file. The filename will be the accountcode value that you have assigned to your extension. To access your CDRs (Call Detail Records), switch to /var/log/freeswitch/cdr-csv and open the CSV file of your account.