
The recent exponential rise of incidents related to identity theft, phishing, and online fraud has created increasing demand for improved security and identity verification. Although biometric identification methods (for example, facial recognition and fingerprint sensors) are gaining popularity, two-factor authentication that leverages email and/or text messages is still the most popular approach. The purpose of two-factor authentication is to make an attacker’s life harder and to reduce fraud risks. If you already follow basic password security measures, two-factor authentication will make it more difficult for cybercriminals to breach your account.
The traditional password approach is a one-factor authentication method and focuses on “something you know”, or the password. Two-factor adds a second factor, typically related to “something you have.” In this example, the second factor is a smartphone with messaging capabilities. Generating a unique code and sending it as a text message improves the integrity of the identity verification step because it assumes only the target user has possession of the mobile device.
In the past, two-factor authentication was difficult to implement because it required a deep knowledge of telephony, mobile carriers, and interaction with multiple APIs that used different protocols and credentials. Flowroute is a developer-centric communication solution that provides a suite of services including messaging. Flowroute has developed several SDKs, including Python, .NET, Ruby on Rails, PHP, and of course Node.js, to facilitate the integration of their APIs into your own code base.
Getting started with Flowroute
You can get started with Flowroute by signing up at https://www.flowroute.com/. After you have an active account, you must provision a phone number or associate an existing number with your account to use messaging. For security reasons, the Flowroute API will only allow you to send Short Message Service (SMS) messages from a phone number within your account. If you wish to port an existing number, refer to the help center at https://manage.flowroute.com/accounts/help/ and follow the related FAQ. To provision a number through Flowroute, select the DIDs tab from your online dashboard then choose the option to Purchase. You will see a form similar to the one shown in Figure 1.
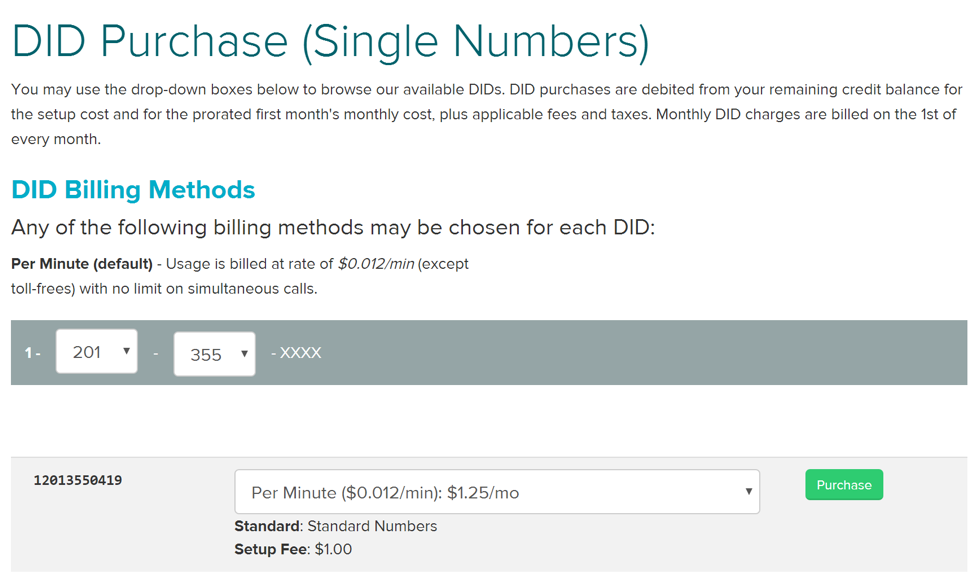 Figure 1: Provisioning a New Number
After you select your area code and exchange, you will be provided with several options to purchase the number. Flowroute will automatically configure your new number to allow SMS messaging.
Working with the API
This site allows you to view documentation about the various APIs and download the related SDKs.
Installing the SDK
Flowroute provides a set of libraries for several languages to make it easy to get up and running with the Messaging API. Navigate to Node.js Library v2 to start working with the Node.js Messaging SDK. From a parent directory, follow these steps to get started:
- Make a directory for your app:
- Change to that directory:
- Install the Flowroute SDK:
- Change the directory to the SDK’s library directory:
- Install dependencies:
- Change the working directory back to the root of the project (“two-factor”).
- 401 – Unauthorized: this typically means your API credentials are incorrect. Double check that your credentials match and that you don’t have extra spaces.
- 403 – Forbidden: when you receive this error, it means you either tried to set the “from number” to a number that is not in your account, or did not enter it as a valid 11-digit E.164 formatted number.
- 500 – Not OK : This usually happens when the “to” number is not a properly formatted 11-digit E.164 number.
- Allow the user to set up their phone number and save it for future use
- Verify the phone number is valid by sending a code. Do not send further messages to the phone until the user successfully enters the code so you are sure they entered the correct phone number. You don’t want to “spam” an unauthorized phone!
- Most two-factor implementations don’t allow codes to work after a period of time. For example, you might set an expiration of 5 minutes for the code and allow the user to generate a new code if they don’t receive their text or update the code in time.
mkdir two-factor
cd two-factor
git clone https://github.com/flowroute/flowroute-messaging-nodejs.git
cd flowroute-messaging-nodejs/flowroutemessaginglib
npm install
The Two-Form Sample App
Now that the SDK is installed, you are ready to test out the sample app. To demonstrate the API, this app expects you to pass on your Flowroute username and password. It will then generate a random code and text it to a number you enter, then wait for the user to enter the code. When the username, password, and code are entered correctly, it displays a success message.
Step 1:
Initialize your project by typing:
npm init
You should see something similar to Figure 2.
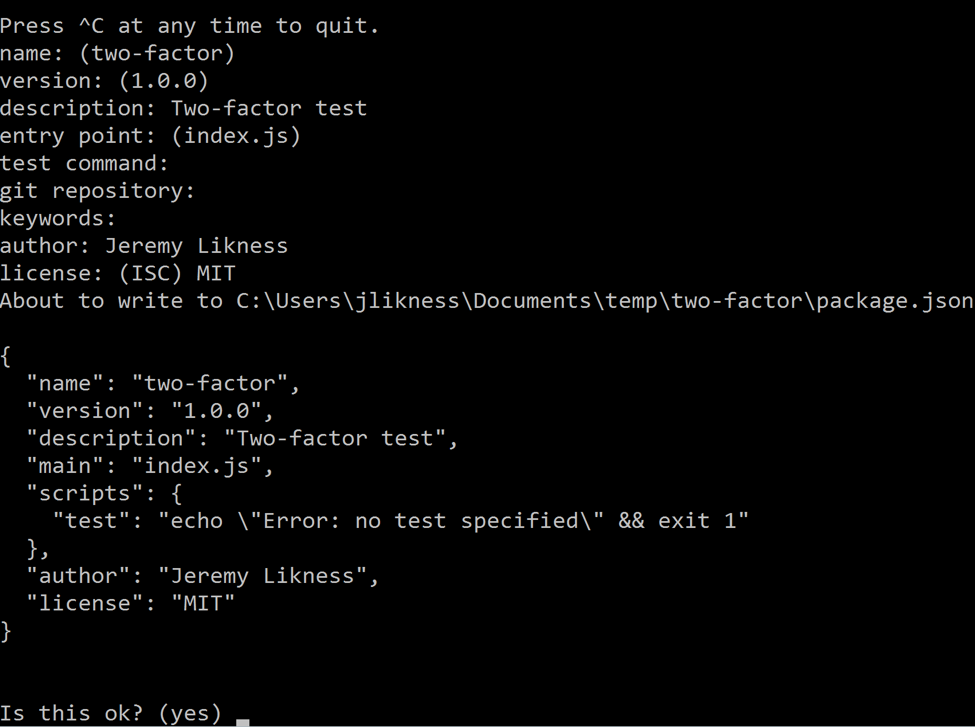 Figure 2: Initializing the app
Step 2:
Accept the package for it to write to disk.
Step 3:
Install a dependency on the prompt library to accept the username, password, and code:
npm install prompt –savedev
Step 4
Now use your favorite IDE to open the directory and create a file named index.js. Start by importing the dependencies and setting up some variables:
var key = '<your key>', pwd = '<your password>',
fromNumber = '<your from phone number>',
flowroute = require('./flowroute-messaging-nodejs/flowroutemessaginglib'),
prompt = require('prompt'),
uname = 'admin',
upwd = 'secret';
Remember the key and password are available on your API page, and are the same ones you used when testing the API. The “from” number should be a valid number in your account.
Step 5
The first step is to verify the username and password. The prompt library lets you require the variables and here the values are simply compared to the global variables. In a production application, you would likely hash the password and send it a backend database or authentication service for verification.
prompt.start();
prompt.get([{
  name: 'username',
  required: true
}, {
  name: 'password’,
  hidden: true
}), function (err, result) {
    if (err) {
        return onErr(err);
    }
    if (result.username === uname && result.password ===upwd) {
      getPhone();
    }
    else {
      console. log('Invalid username and password combination.');
    }
});
Step 6:
Next, obtain a phone number to send the text message to. It must be a valid 11-digit number, so the regular expression checks for exactly 11 digits.
function getPhone() {  var phone = ' ';

  console.log('Enter a phone number to receive your login code.');

  prompt.get([{
    name: 'phone',
    required: true,
    conform: function (value) {
      return / ^[0-9]{11}$/.test(value);
    }
  }), function (err, result) {
      if (err) {
        return onErr(err);
      }
      sendCode(result.phone);
  });
}
Step 7:
The next method uses the Flowroute API to send a text message with the code. Notice how simple the process is: set up your credentials, pass the message, and handle the response:
function sendCode(phone) {   var code = Math.floor(Math.random()*900000) + 100000;

  flowroute.configuration.username = key;
  flowroute.configuration.password = pwd;
  flowroute.MessagesController.createMessage({
    to: phone,
    from: fromNumber,
    content: 'Your secret code is' + code
  }, function (err, response) {
    if (err) {
      return onErr(err);
    }
    getCode(code);
  });
}
Step 8
Finally, check that the code entered is valid and show a success message if it is.
function getCode(code) {
  console.log('Enter your secret code to continue.');

  prompt.get({
    name: 'code',
    required: true,
    conform: function (value) {
      return value == code;
    }
  }], function (err, result) {
      if (err) {
        return onErr(err);
      }
      console. log ('Success! You have unlocked two-factor  authentication.');
  });
}
Step 9:
The last bit of code handles any errors that may be encountered.
function onErr(err) {  console.log(err);
  return 1;
}
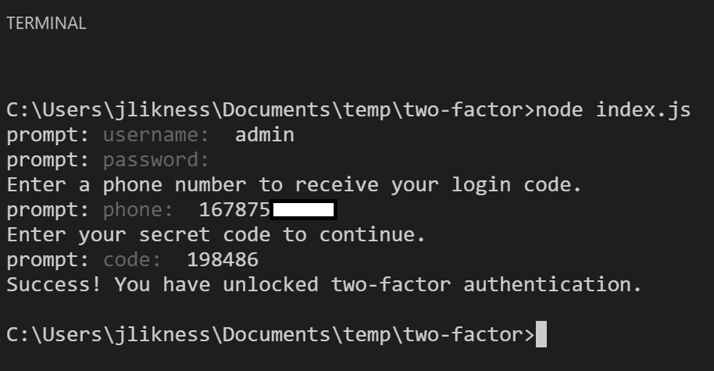
The example application is now ready to run. From a Node.js command prompt, type:
node index.js
You will be prompted for a username and password, a phone number to send a code to, and the code itself. A successful run is shown in Figure 3.
You may receive an error from the API. The following list contains common errors and how to troubleshoot them:
Finally, if you are prompted for the code but never receive one on your test phone, check your Flowroute online dashboard and reach out to customer support to confirm your phone number is provisioned for SMS.
Conclusion
The example application demonstrates how easy it is to programmatically send SMS messages to a mobile device. To use this functionality in real-world application, you would want to take a few more steps, including:
Of course, the Flowroute API v2 allows for more than just sending text messages. It also allows you to programmatically respond to incoming text messages and look up details about messages that have already been sent. When your application requires messaging, choose the Flowroute API because it is a quick, easy solution that was designed specifically for developers to seamlessly integrate messaging into their own applications.