Installation
- First, start a command shell session and clone the Python GUI app:
- via HTTPS:
git clone https://github.com/flowroute/e911-json-to-csv.git
- via SSH:
git clone https://github.com/flowroute/e911-json-to-csv.git
- Switch to the newly-created e911-json-to-csv directory.
- If you are running Python 2.7, skip this step and see Usage below. To confirm which version of Python you are running on a Mac, run the following:
python --version
If you do not have Python 2.7, see Python 2.7.0 Release or set up a virtual environment for Python 2.7.
Usage
Tkinter is Python's de-facto standard GUI package, yet I have only heard of it yesterday. I like the simplicity and I can see why it continues to be supported and is considered a minor tradition of the Python world. To systematically check for Tkinter support on your machine, see Checking your Tkinter support on the Python wiki Tkinter page. If you encounter a module or package not found error, refer to Installing Packages in the Python Packaging User Guide to learn more about different ways to install Python packages.
Run the app locally
With all installation requirements out of the way, simply run the following:
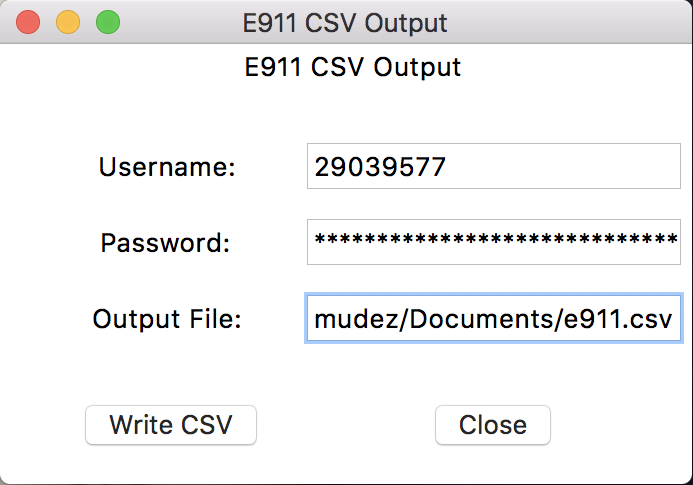
python json2csv.pyThis should pop up a small window which will require your Flowroute API Access Key or username, Secret Key or password, and Output File or path to write your CSV file to. Since I'm lazy, I ran the following optional step:
Set and source environment variables
To learn more about setting environment variables, see How To Read and Set Environmental and Shell Variables. In a pinch, you can create an fr_env.sh file in the same directory and add the following lines:
export FR_ACCESS_KEY=<YOUR_FR_ACCESS_KEY>
export FR_SECRET_KEY=<YOUR_FR_SECRET_KEY>
export FR_CSV_OUTPUT=/path/to/e911.csv
Source the file as follows:
. fr_env.sh
Then run json2csv.py as shown above. With your credentials auto-populated like shown in the screenshot below, click Write CSV to write the file to the path that you specified.
To review the CSV file that has been downloaded to the path that you specified, open the file. That's it! Start doing your data magic.
Run the app with Docker
When running this app using Docker, you will have to install XQuartz. Of course, if you haven't downloaded Docker on your machine yet, see About Docker CE.
Install XQuartz
brew cask install xquartz
Turn on X11 Forwarding and allow connections from network clients
Make sure the remote ssh server supports X11. Add the following line to the etc/ssh/sshd_config file.
X11Forwarding yes
Open up XQuartz and update Xquartz > Preferences > Security. Check "Allow connections from network clients".
Set the DISPLAY variable
Xquartz provides a telnet app which automatically has the DISPLAY variable already set. If you are using iTerm2 like me , you will have to manually declare the variable.
export DISPLAY=:0
To confirm, run the following:
echo $DISPLAY
Disable access control
The xhost program is used to add and delete host names or user names to the list allowed to make connections to the X server. Read more about it here.
xhost +
Log in to remote host
For this demo, you can use your machine's IP as your hostname.
ssh -X <your_computer_IP>
Build your Docker image
Once you're logged in, switch to the directory that contains your Dockerfile. In this case, it will be the local path for this repo:
cd path/to/e911-json-to-csv
Build your Docker image to install the app dependencies. Make a note of the resulting image ID.
docker build .
Set and source environment variables
See source section above.
Run your Docker container
Run the Docker container, passing along the environment variables and sharing the volumes.
run -it -e DISPLAY=<your_computer_IP>:0 -e FR_ACCESS_KEY=$FR_ACCESS_KEY -e FR_SECRET_KEY=$FR_SECRET_KEY -e FR_CSV_OUTPUT=$FR_CSV_OUTPUT -v /tmp/.X11-unix:/tmp/.X11-unix -v `pwd`:/app/out/ <docker_id>
Example Usage
docker run -it -e DISPLAY=192.168.2.161:0 -e FR_ACCESS_KEY=$FR_ACCESS_KEY -e FR_SECRET_KEY=$FR_SECRET_KEY -e FR_CSV_OUTPUT=$FR_CSV_OUTPUT -v /tmp/.X11-unix:/tmp/.X11-unix -v `pwd`:/app/out/ 31a46a53fe41
For an explanation on docker run arguments, see the reference page.
This should bring up the XQuartz window with the fields auto-populated. If you read through this entire thing, again, write your CSV file and do your data magic!